
How to take Beautiful Waterfall Photographs
Anthony has a great love of waterfall photography, as it combines both exploring the Australian wilderness and escaping the city for some mental rejuvenation. He has explored countless regions in Australia looking for the perfect waterfalls to photograph and through years of trial and error he has learnt the best settings to use for photographing these tranquil places. Anthony shares with us his personal knowledge and experiences on how to take beautiful waterfall photographs below.
What Weather is best for Photographing Waterfalls?
For ideal shooting conditions for waterfalls you will want to head out on a completely overcast and gloomy day. This allows for a beautifully soft, diffused light over everything that will make it much easier to take a good photograph. That way you will be able to avoid harsh patches of sunlight over the scene and the shadows won’t be as strong. Early morning or late evening are also good times as the sun is not as strong when it’s close to the horizon and, if your waterfall is down in a gully you may even be out of the reach of the sun. A day or two after a solid downpour of rain will also be the perfect time to head out with your camera, as waterfalls will generally be at their best and most impressive with a good flow of water over them. Just make sure to take some insect repellent to help protect against leeches and mosquitoes!
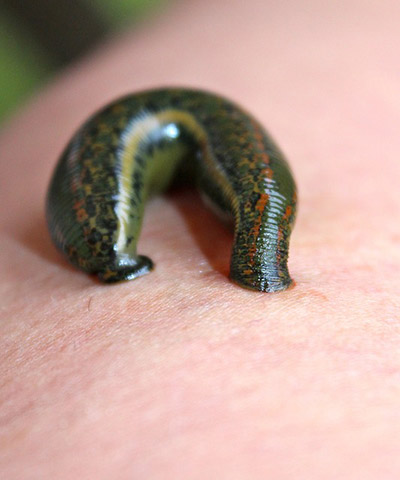 Leeches – the hitchhikers of the forest
Considering how I first started out with these buggers (I was terrified and thought they were killing me!), I don’t really mind them anymore.. they’ve become my friends of the forest. But not everyone feels this way about them!
Over many years I’ve found that, prior to hiking in to waterfalls, a good dose of insect repellent sprayed over exposed skin and your socks, combined with a light sprinkling of salt (optional) over your legs is the best deterrent from these. Or, if you can handle the psychological challenges, you could simply let them tag along and have their feed! Leeches actually cause no harm to humans and tend to drop off after about 20 minutes.
What Equipment should I have for Photographing Waterfalls?
Opinions can differ here, but the only equipment I have ever used for photographing waterfalls and would ever recommend is a camera, tripod and polarising filter – that’s it! It’s not rocket science and you don’t have to take thousands of filters to do it!
Camera
Any camera will do the trick; it doesn’t have to be a super expensive one, just one where you have manual control over the settings is perfectly suitable.
Tripod
A tripod is definitely a must to be able to obtain that long exposure shot necessary to create a beautiful silky-smooth effect in the water and prevent the rest of the scene from turning out blurry. Keep in mind that some waterfalls are quite a distance to walk to so the lighter the tripod you can get your hands on the better.
Polarising Filter
This nifty little piece of gear attaches to the front of your lens and acts like a pair of sunglasses on your camera. It’s not necessary to have the most expensive CPL (Circular Polarizing Filter) either, the cheaper ones do just as good a job as the more expensive brands. They help by removing glare and distracting reflections from the scene, and will actually reduce the amount of light entering the camera by around 2 stops, which will help you achieve a longer shutter speed.
Play with the slider below to see the difference it makes when using a polarising filter compared to without.


Do I need an ND Filter as well?
I’ve seen a lot of blogs out there that swear by using Neutral Density filters for photographing waterfalls, as they help to further reduce the amount of light entering the camera leading to a longer exposure. If you were to photograph a waterfall under clear skies in the middle of the day then yes they would come in handy, but you can avoid using these by simply sticking to the overcast days or changing the time of day you go out. They should only be considered as optional and are in NO WAY necessary to get a beautiful photograph. Plus, considering these can go for upwards of $200 it’s just another expense you don’t need right?!
Waterfall Photography Settings – What’s the Secret?!
Waterfalls, or more accurately the places where waterfalls exist tend to be quite intimate, cozy and powerful places, and you can quite easily become overwhelmed with the wonder and amazement of where you are. This is why I try and take at least 10-15 minutes to let it sink in, just sitting and looking around at the scene, mentally jotting down what it is that I enjoy about the place or what elements grab my attention the most; this will usually be the basis of my composition. It’s a good idea to also take a breather here after hiking in, so why not take this time to have something to eat and drink and walk around the place, checking out which angle you might prefer to shoot from; use your creativity here to suss out what looks interesting to you!
Once you’ve decided on your composition, grab your gear and get yourself set up… triple check those tripod legs too if you’ve set up on some rocks; the last thing you want to see is your tripod tipping over and your camera ending up in the creek!
Setting up your Camera
Time to enter the scary world of shooting manual…kidding!!
ISO Settings
It’s really not that bad! Setting your camera to Manual will now allow you to have full control over how you want your end photograph to look. A good starting point is setting your ISO to the lowest number, which is 100 on most cameras. A general explanation is ISO = Noise (grainy photos)… we don’t want any more noise appearing in the photo than we have to. There are cases where this rule doesn’t apply, but for waterfall photography purposes it’s fine.
Aperture Settings
Aperture is the next important setting to consider. This varies a bit between lenses but I find an aperture value of f9 to be the “sweet spot” for my lens and provides the sharpest images for me – your lens may be a little different to this. A good starting point will be anywhere between f8 and f16, this is something you can play around with as you go. It’s important to note that setting the aperture too wide or too narrow can result in slightly softer images and less sharpness due to diffraction.
I usually set my desired focal point at this stage by turning off image stabilisation and auto-focus on the lens (usually located on the left side of the lens) and manually focusing one-two thirds of the way into the scene. Try and focus on a rock near to the waterfall, which I’m assuming will be your point of interest. Image stabilisation isn’t necessary as we are set up on a stable tripod and it can actually create slight movement in the lens when taking a photo, which could lead to a blurred photo.
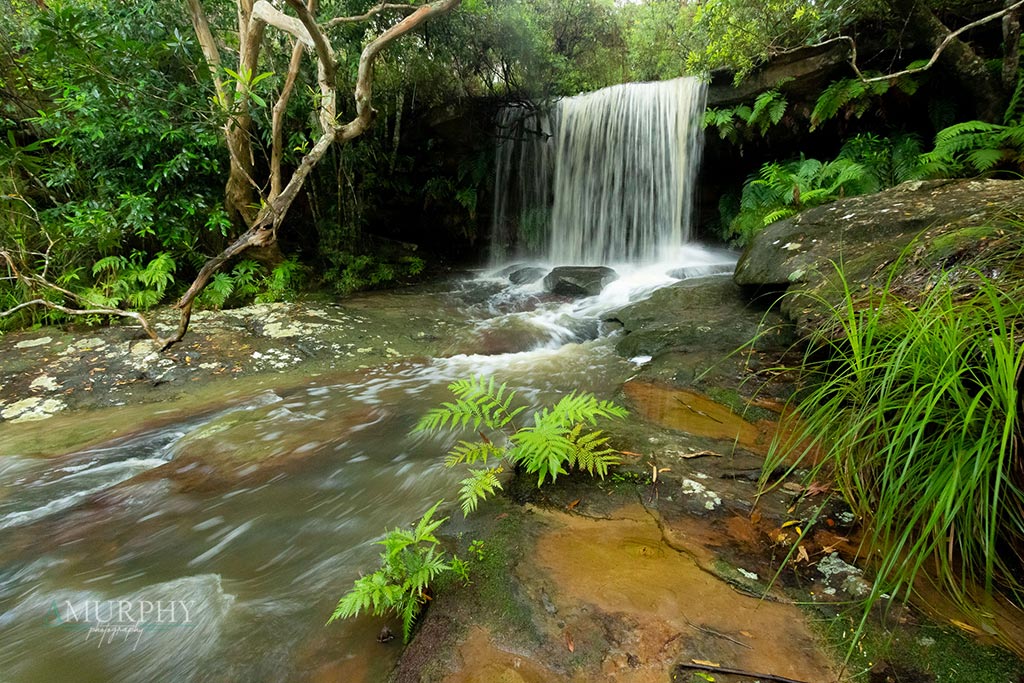
Shot at ISO1600 – f9 – 1/13sec

Shot at ISO100 – f9 – 2.5sec
In the above two images you will see I’ve taken them at different settings; one to maintain the smooth water effect and the other to maintain the sharpness of the ferns/grasses in the photograph. These were later combined into one using Photoshop to complete the photograph I was envisaging.
Shutter Speed Settings
With the exposure triangle almost complete, we just need to determine a shutter speed that will provide us with a long enough exposure to soften out the flow of water. Assuming the lighting conditions are optimal (the best weather conditions described at the start of this article), you should be getting a shutter speed of between 1-4 seconds with these settings which will achieve a near perfect exposure. Now it’s just a simple matter of fine-tuning!
Too Dark?
If your photograph is too dark you can simply slow down your shutter speed. Note that the longer your shutter speed, the greater chance there is of having motion blur in nearby ferns and trees.
Too Bright?
If your photo is too bright you can either increase your shutter speed or adjust your aperture. Your shutter speed should be no less than 0.4-1 seconds to maintain the smooth water effect, otherwise you can dial up the aperture number to say f16. The greater the “f” number, the darker your photo will appear. Keep in mind here that if you adjust your aperture you will need to re-focus your shot to ensure that it will remain sharp.
Another random fact to keep in mind is the height of the waterfall. If the waterfall is quite tall you will probably require a longer shutter speed of 4+ seconds to maintain a smooth water effect – the greater the distance the water has to fall, the longer the exposure you will need to smooth it all out!
With all these settings locked in it’s just a matter of practicing and trial and error with your composition until you get that perfect waterfall shot that you’ve been dying to nail for ages!
I hope this has helped you further your skills in waterfall photography and if you appreciate what you’ve read why not leave a comment below and say hey!